 Press the push switch to 'throw' the dice: this makes the circuit rapidly cycle
through the dice numbers so that an effectively random dice number is displayed
by the LEDs when the push switch is released.
 Press the push switch to 'throw' the dice: this makes the circuit rapidly cycle
through the dice numbers so that an effectively random dice number is displayed
by the LEDs when the push switch is released.
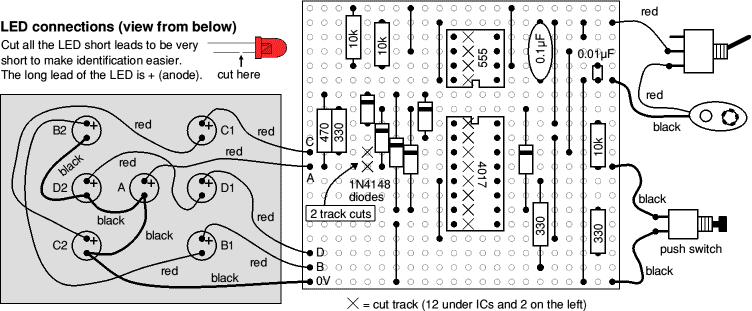
Drill seven 5mm holes in a dice pattern to mount the LEDs on a panel such as a plastic
box lid or sheet of thin plywood. They should be a tight fit but a little glue can be
applied from the underside if necessary.
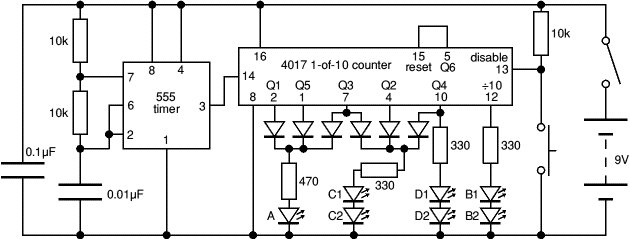
 The 555 astable circuit provides clock pulses at about 5kHz for the 4017 counter
which has ten outputs (Q0 to Q9). Each output becomes high in turn as the clock
pulses are received. Only six counts (Q0-Q5) are needed so Q6 is connected to reset.
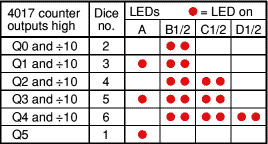
Appropriate outputs are combined with diodes to supply the LEDs: for example Q1, Q3
and Q5 are combined for LED A.
The dice sequence has been started at 2 so the ÷10 output can be used for LEDs B1 and B2, this saves diodes and simplifies the circuit. Pressing the push switch makes the disable input low so that counting occurs.

